xpi Monitor (Magic xpi 4.14)
xpi Monitor is a complete UI refresh of the Magic Monitor available till xpi 4.13.5. It provides a visually appealing and intuitive interface for tracking the Magic xpi projects.
The new Monitor lets you manage and monitor the Magic infrastructure, and to get accurate information about your projects, from a single intuitive and easy-to-use dashboard. You can view the information for the whole project or you can select different levels within the project, and you can use filters to display information from specific times. The information displayed is updated regularly. The status of each project is taken from the IMM.
The information provided by the Monitor lets you examine the project and see where you need to make any modifications to improve performance. For example, you can identify issues caused by heavy data loads or by a possible shortage of licenses.
The xpi Monitor also provides you with alerts to problems when they arise. For example, an engine that is running on an alternate license, or that the status of IMM has been compromised.
In addition, you can make adjustments to the servers without having to go back to the Magic xpi Studio to reconfigure your project.
|

|
-
The Monitor is based on a database table called ifs_actlog that stores all of the records.
-
For information about how to change the location of the projects folder, click here.
|
Make sure that Host mappings are done in the host file. Now you can access the Monitor using the URL below:
https://<domain prefix>.factoryeye.net/magicmonitor/#/auth/login
For example, https://xpi.factoryeye.net/magicmonitor/#/auth/login
Alternatively, you can access the Monitor by using the xpi Monitor shortcut created during the Magic xpi installation.
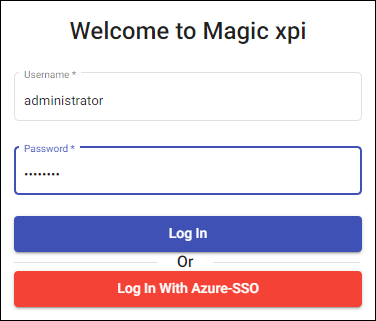
The xpi Monitor shortcut will open a link in a browser and the following login screen will appear.

A default user is set statically during the installation process. The login details for this user are:
-
Operator. The operator can start and stop projects:
-
Username: administrator
-
Initial password: changeit
You can add additional information about the user by clicking the settings icon under the username. The administrator also has rights to delete other users.
Azure Authentication for xpi Monitor
Alternatively, you can login to xpi Monitor using Azure-SSO. For this, you need to perform two steps.
-
Configure Certificates on the IMM Host Machine
Azure authentication requires valid certificates with the relevant domain name installed on the IMM Host machine where the Kubernetes cluster is deployed. For this, get the valid certificates for the domain from the appropriate Certificate Authority and copy the certificate and its key to the IMM Host machine. For detailed instructions, refer to the Linux documentation for installing and configuring the certificates on the Linux host.
-
Configure Azure SSO Details in Monitor Config
Go to the config.json file under the <Magic xpi installation>\InMemoryMiddleware\config folder. Here edit the clientId, authority and the redirectUrl for authenticating with the Azure SSO. You can work with your system administrator to get these values.
Once these steps are completed, you will have to redploy the IMM for the changes to reflect.
Now on the xpi Monitor login page, use the Login with Azure-SSO button. The default user name and passwords will not work in this mode.
Azure authentication requires the xpi Monitor to be accessed using HTTPS protocol.
The xpi Monitor requires the SSL certificates to be installed before using the Azure SSO login option. The default option of Administrator Login does not have any certificate dependency and will work without it.
The xpi Monitor has the following main dashboard:
The Monitor layout can be customized by using the Drag me around button on the dashboard. You can change the theme (Light and Dark) and layout.
This module collects the license usage data of all the servers which are running in the IMM.
The data collection frequency can be configured by the user. The default value is 1 minute.
The collected data can be useful in analyzing reduced performance due to the lack of licenses (pending queues) for the running projects.
The timezone for xpi Monitor can be defined using the TZ environment variable under the immMonitor deployment section of the values.yaml file located in the <Magi xpi installation>\InMemoryMiddleware\deploy folder. This timezone will be used by the xpi Monitor to display the time based on the timezone defined on all the tabs in the Monitor. The default time zone is US/Central. You can change it as per your requirement.
Starting and Stopping Projects from the Monitor
Magic Monitor Critical State Alert Notification

