How Do I Work with DateTime Database Fields in Magic xpi? (Magic xpi 3.x)
Magic xpi does not have native support for the DateTime data type. To SELECT, INSERT, and UPDATE DateTime values to and from the database using the Magic xpi Data Mapper, you need to handle these values as strings.
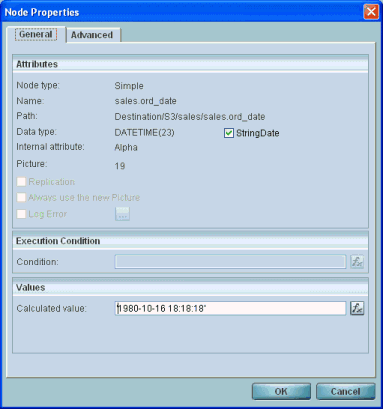
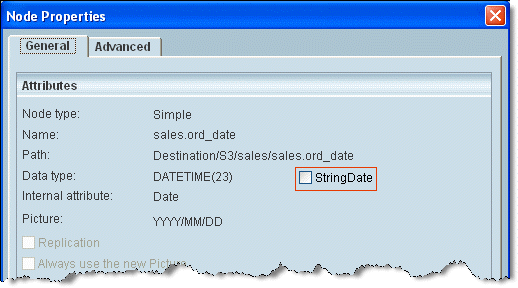
Magic xpi provides an easy configuration, at the node level, which instructs the Magic xpi Server to handle the DateTime value as a string. The check box that controls this behavior is called StringDate, and is available for Date data types (see the image below).
Databases with a DATETIME Field
To insert Date and Time into a DATETIME data type field, select the StringDate check box.
After selection, the Node properties of the Date field should look like the following image:
Note: After this modification all Date database fields will be interpreted as a string.
For example, if MSSQL’s DateTime format is 10/01/2007 11:22:41, you can use the following expression in the Calculated value field:
DStr (Date (),'DD/MM/YYYY')&' '&TStr (Time (),'HH:MM:SS')
Oracle Databases
1. Settings
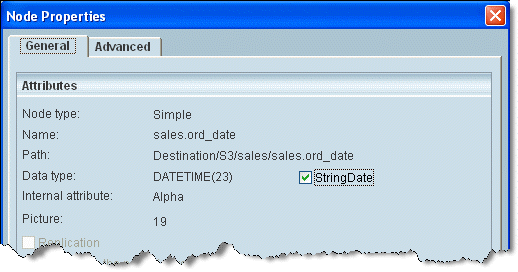
To insert Date and Time into a DATETIME data type field, check the StringDate check box.
Note: After this modification all Date database fields will be interpreted as a string.
After you check the box, the Node properties of the Date field should look like the following image:
2. In your Magic xpi project:
Once you have made the relevant changes to the settings (as described above), you need to set the NLS_DATE_FORMAT in Oracle. To be able to insert a DateTime value in Oracle you need to make modifications in two separate Destinations (in the same Data Mapper or in two different Data Mappers).
Destination 1:
-
In the Source/Destination Management dialog box, set the Destination type to Database.
-
Click the Properties button.
-
From the DB Operation field, select Delete (not Insert).
-
Click the SQL button and type the following Oracle SQL command:
alter session set NLS_DATE_FORMAT='YYYY-MM-DD HH:MI:SS'

This SQL command sets the NLS_DATE_FORMAT of the current Oracle session to: 'YYYY-MM-DD HH:MI:SS'.
-
In order for the changes to take affect in Magic xpi you have to click Map and then OK.
Destination 2:
-
In the Source/Destination Management dialog box, set the Destination type to Database.
-
Click the Properties button.
-
From the DB Operation field, select Insert.
-
Select the relevant table and fields using the Magic xpi wizard and then click Map.
-
Map or directly insert the required data.
-
In the Date field use the exact format you specified in the previous step.
For example: '1980-10-16 18:18:18'