Routing in Web Client
Routing in general has a high significance when it comes to creating Web applications. Routing is essential to be able to access different pages in a Web SPA (Single Page Application). Magic xpa provides a functionality that enables you to implement Routing in your Web applications.
What is Routing?
Routing is navigation from one Web page to another in a SPA Web application.
With the ability of Routing in xpa, you can do the following within your Web Client application:
-
Enter a URL in the Address Bar of the browser to navigate to a desired page.
-
Click hyperlinks on the page to navigate to the desired pages.
-
Raise the Route Event by the Client (Angular, JS, etc.)
-
Click the browser's Back and Forward buttons to navigate backward and forward through the history of pages visited.
Understanding Routing in xpa
In order to implement Routing in Magic xpa, you need to understand the following important components of routing functionality:
-
Route Event
-
Route Event Handler
-
Task Route/Name Property
-
Task Parameter Exposed to Route Property
-
Call Operation Properties
-
Route Event Handler Flow
-
Subform Control Properties
-
The app.routes.ts File
1. Route Event
This is a new internal event introduced with Web Client. Route event can be raised explicitly, just as you can raise any other Event in Magic, i.e. attaching it to a Push Button, or by the Browser (the Client) i.e. specifying a URL, or by activating the Route command in Angular. You can find Route event in the list of All events and Task events.

2. Route Event Handler
Route event handler is required to be defined in the Startup program mentioned in the Web Application Settings screen. At the time of creation of Route event handler, two read-only string parameters named Route name and Outlet name of type Alpha, size 30 are created in the event handler. These parameters are read-only in Property list and in Task Logic too.
This handler can contain only Call operations (Program/Subtask).
This handler should contain all Call operations related to routing.

3. Task Route/Name Property
A new property Name is added in the Task Properties > Interface Tab > Route group to specify the path. This property won’t be directly used to map to task component. It will be copied to Call operation’s Route name property from where you can change it if you want to.
4. Task Parameter/Exposed to Route Property
A new property is added to the Task parameter named Exposed to Route with values Yes/No (without expression). If the property is set to Yes, the route url is required to have this parameter.
The use of Parameters in Route:

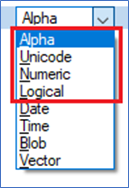
You can expose only simple type parameters i.e. Alpha, Unicode, Numeric, or Logical. You should expose minimum parameters to the Route. The standard use of parameters in Route is for Ranging or locating records in the called program/task.
5. Call Operation Properties
On-top of the standard properties of the Call operation, you have two new properties:
-
Route name: This property gets its initial value from the Route name property of the called program/task, you can change this value.
-
Route parameters: This is a Read-Only property that presents the expected parameters of this Route. The parameters are defined by the Expose to Route property of each parameter in the called program/task
You can use Call operation to call the program which is identified by the Route name specified in the Route name property of this operation. The Route name property is also the name which should match with the route name in the url when the Route is invoked from a url. The Destination property can be used to specify the Router outlet in which a particular program needs to be called.
6. Route Event Handler Flow
The execution of Call operation in this handler has some unique behavior:
-
The Condition property: On the top of any expression that you put in this property, Magic xpa will add an internal condition. According to this condition, Magic xpa will match the value in the ‘Route name’ parameter to the ‘Route name’ in the Call operation property.
-
The Destination property: If the property is empty, the destination will be to the Default Route sub-form of the task where the Route handler is located. If you want the Route to be executed to a non-default Outlet, you need to provide the Control Name of the Sub-form that is defined as Route Outlet and set the property Default Route to No (even when you have multiple sub-forms).
-
The Call program/task Parameters: You can send any parameters to the call program/task, those parameters will be calculated during runtime like any other Magic parameters. But if you defined the parameters as Exposed to Route, those parameters are expected to be provided in the url and will overwrite the runtime value of the relevant parameters. Means, the value that Magic xpa will send to the called program/task will change depending on the route trigger. If you raise the Route event from within the Magic xpa, the value will be based on the Magic engine. If the trigger for the Route is from the Angular (Browser), the value will be taken from the parameters in the url.
When a Call operation’s Route name is matched with the parameter Route name and when the Call operation’s Destination is either empty or is matched with the parameter Outlet name, and the extra Condition expression (if exists) is evaluated to True, then the Call operation is executed.
7. Subform Control Properties
The Subform is used as a container of the routed task, i. e. Router Outlet. Two properties Is Router Outlet and Is Default Outlet; are introduced for Subform control for Web Client tasks.
-
Is Router Outlet: This property is set to ‘True’ with the intention of making the Subform to serve as a Router outlet. That means on setting this property to ‘True’ the Subform will work like a placeholder of the routed content.
-
Is Default Outlet: You can have multiple Router Outlets on a form; but only one can be defined as a Default Outlet, in the Route handler. If you do not set the Destination property and you do not send the Outlet name parameter to the Event, the default outlet will be used. If you provide the two, the Subform that has an equivalent Control Name will be used.
8. The app.routes.ts File
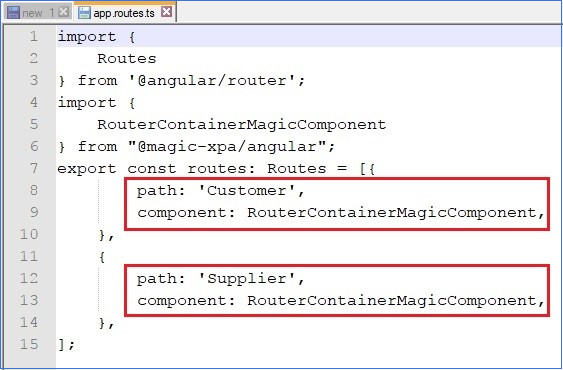
The app.route.ts file stores the route paths.
The file contains the following three parameters:
-
Route: A route maps a path (such as ‘/persons’ or ‘/cart’) to an Angular component. In any url A/B/C, the strings ‘A’, ‘B’ and ‘C’ are Route names that identify three angular components.
-
Component: Magic xpa uses a generic name here for routing. The component/Magic xpa task will be decided by Magic xpa itself during runtime.
-
Outlet: It is the area in HTML where the said component is displayed. The outlet is implemented using a Subform Control.
The contents of the app.route.ts file look like as shown below:

Routing Process
To understand the Routing process in Magic, let us see an example where you have a Root task and two Routed tasks as shown:

The Root task contains the following controls on its form:
You also have two Routed tasks: WebClientCustomers and WebClientSuppliers. Both the Routed tasks are called in the same outlet.

You can see two read-only variables created under the Route event definition.
While executing when you click on the Customers button, the WebClientCustomers program is called and the customer details are displayed in the outlet of the Root task. Notice that the address bar shows ‘/Customer’ as shown below, which you mentioned as in the Route name property of the Call operation. Magic xpa engine remembers the path of the customer details.

Similarly, when you click on the Supplier button, the WebClientSuppliers program is called and you can see the supplier details in the outlet of the Root task. Notice the ‘/Supplier’ in the address bar.

Now if you want to go back to see the customer details again, you click on the Customers button and Magic xpa engine takes you to the path it remembered for the Customers button. With Routing, you can navigate to all the paths that you visited previously.
|

|
-
In case of multiple Subforms, you can set the Is Default Outlet property of the one that you desire to make the Router Outlet.
-
You can navigate only one level down. Meaning, if you want to route to page C from page A, you have to go through page B.
-
The operations such as Copy, Cut, Overwrite and Move through shortcuts or Ctrl + Shift are not allowed from non-Route to Route events.
-
Once you are inside the Route event handler, you can use Call Program/Subtask and Remark. If you try to change any event to Route event, the entire chunk of operations under the event definition is deleted.
-
You can change any event to Route but the other way round is not possible.
|
Route name - Call Operation
Subform Detail Properties
Since version: 4.0

