OData - XML (Magic xpi 4.14)
The OData connector is integrated with the pagination feature of the OData API to fetch data in chunks. The pagination is supported by OData using the @odata.nextLink property of the OData request. The user can specify the maximum number of pages returned per request and map the @odata.nextLink with the variables in the Magic xpi project. These values can be configured on this resource with properties Max pages and Next Page Link respectively. Both the properties are applicable for the GET operation only.
To configure the connector, double-click or right-click on the step and select Configuration from the context menu to open the OData Configuration dialog box.
This dialog box contains the following fields:
|
|
|
|
Connection
|
|
Resource Name
|
The name of the resource that you selected in the connector's Properties pane. The resources are defined in the Settings dialog box's Resources section.
|
|
Operation
|
|
Headers
|
The operation's header information.
There are two ways to enter the required header information. You can either click  to open the Expression Editor, or you can click to open the Expression Editor, or you can click  to open the Headers Form. to open the Headers Form.
|
|
Entity
|
Click to open the Select an Entity Set list. Select the entity that the operation will be performed on.
|
|
Method
|
The method that will be performed on the selected entity.
Select one of the following methods from the drop-down list:
|
|
Endpoint URL
|
The OData resource URL, and the selected entities and parameters. This field is parkable and non-editable.
|
|
Parameters
|
The OData query parameters.
There are two ways to enter the required query. You can either click to open the Expression Editor and enter your query manually, or you can click to open the OData Query Wizard. After using the wizard to create a query, you can also manually change the query in this property.
This is available only if you selected Get in the Method parameter (above).
|
|
Paginations
|
|
Max Pages
|
Define the maximum number of pages to be returned as part of the OData request.
In case the user enters the value as 0, it will be set back to the default value of 50.
(Since version: 4.13)
|
|
Next Page Link
|
Click to open the Variables List. Select a variable to map the next page link value coming from the OData request.
(Since version: 4.13)
|
|
Use NextLink as Endpoint
|
When pagination is used, the variable for the Next Page Link (above) will be populated with the URL to get the next set of pages. To fetch these set of pages on the next OData step, the Next Link value should be used instead of the Endpoint URL.
To set the Next Page Link value as the OData Endpoint instead of the Endpoint URL, select this check-box.
To fetch the next set of pages in the same step, run the step in a loop.
The check-box will only be enabled when the variable for the Next Page Link is selected.
(Since version: 4.13)
|
|
Output
|
|
Store Result In
|
Defines where you want to store the resulting XML file. Select one of the following from the drop-down list:
-
Variable: Select a variable to hold the entity data that is returned by OData.
Click to open the Variables List. Select a variable where this information is to be stored (the default is C.UserBlob).
-
File: Select a file to hold the entity data that is returned by OData.
Click to open the Expression Editor, or click  and enter the file path where this information is to be stored. and enter the file path where this information is to be stored.
|
|
Operation Success
|
This field lets you easily determine if the data entity was successfully located in OData. Select one of the following from the drop-down list:
-
None: Select this option if you do not want to save the connector’s success or failure status.
-
Variable: Click to open the Variables List. Select the variable where you want to store the connector's success or failure status.
|
|
Refresh Schema
|
Click the Refresh Schema button to create a schema for the OData entity selected. The schema will be generated based upon the OData metadata.xml generated on the resource.
If the schema already exists, the current schema will be overwritten and synced with the OData metadata. If the schema does not exist, it will be created as per the metadata.xml of the OData resource. The configuration information will be saved, and the Data Mapper window will be opened with the selected schema as the Destination. This is applicable for all operations other than the Get Operations.
|
The Data Mapper schema will show the entity level and row level annotations. The annotations are defined on the OData resource and get reflected in the Data Mapper step as represented in the image below.
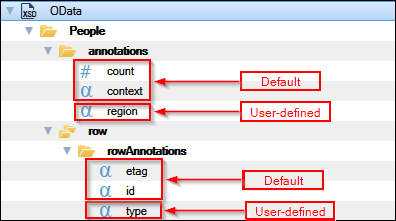
The entity level annotations, both default and user-defined, will be available under the annotations element which will be the immediate child elements of the top-level entity name element.
The row level annotations, both default and user-defined, will be available under the rowAnnotations element which will be the immediate child elements of the row element. They will be available for each row of the entity.
|

|
-
For the upgraded or migrated projects the schema needs to be refreshed before using the annotations. Once the schema is refreshed, the new annotations on the resource will be available in the Data Mapper.
-
The count element mappings might break after refreshing the schema and will have to be remapped.
|
For more information, click OData Resource.
(Since version: 4.13)
