How Do I Set Up My Computer for MSMQ? (Magic xpa 3.x)
MSMQ or Microsoft Messaging Queues is Microsoft’s standard for sending messages to queues managed by Microsoft. MSMQ is a part of the Windows 2000 and Windows XP setup but is not part of the “Typical” setup configuration. Let’s see how to install it.

Before you can work with MSMQ, you need to have it installed on your computer. To do this:
-
Select Windows Start->Control Panel.
-
Click on Add/Remove Programs.
-
Click on the Add/Remove Windows Components icon on the left.
-
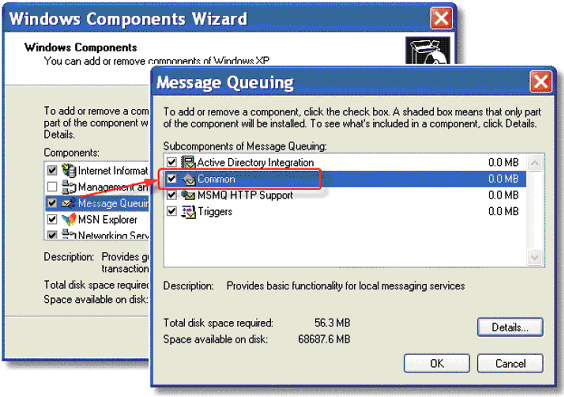
Select Message Queuing. Select the check box.
-
Click on the Details button.
-
Select Common.
-
Keep clicking OK to continue the install.

-
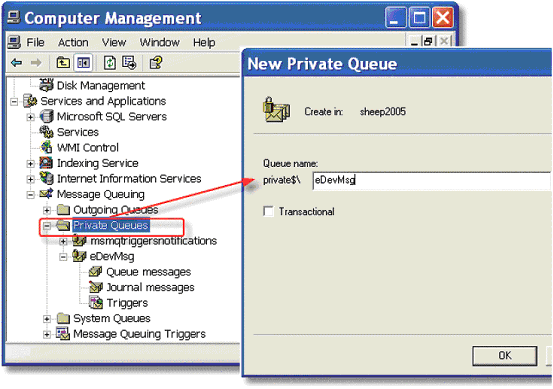
Open Control Panel->Administrative Tools->Computer Management.
-
Open Services and Applications->Message Queueing. You can add queues to Private or Public queues, but you will only see Public queues if Active Directory is installed.
-
To add a queue, select New->Private Queue from the right-click menu. (or Public Queue, as needed).
-
A New Queue dialog box will appear. Give the queue a name (in our example, it is $\eDevMsg. This is the name you will use when opening up a queue in Magic xpa.
-
Check the Transactional box if needed. Some versions of MSMQ do not allow sending non-transactional messages to a transactional queue.
-
Then click OK. The new queue will be created.
This is installed when you installed Magic xpa, if you selected it as part of the installation. If you don’t have it, you should rerun the Magic installation, using the Add/Remove option.
There are two logical names that are used in working with messaging:
-
MessagingComponentDir: this points to the messaging component. The component is an .ecf file, and contains programs and handlers for you to use in working with messaging. An .eci file is also included, so you can add this component to your application.
-
MessagingErrorLogFile: this points to the location of the error log.
For help in how to set up the component, see How Do I Load a Component Into My Project?.

