How Do I Replace an Entry in the Studio with Another Entry? (Magic xpa 3.x)
Items in Magic xpa are often referenced by their sequence number. For instance, you will probably make calls to programs that look something like this:

Suppose you moved the Order Entry program at Line 11 to Line 56. That would be no problem; Magic xpa would automatically change the code above to Call Program 56 Order Entry.
But suppose you want to call a new version of the Order Entry program that you just developed? How Do you move it into production?
The answer is, that you need to replace Program 11 with your new program.

-
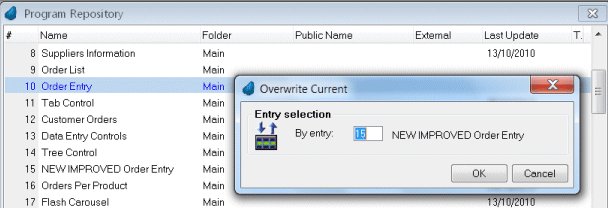
Position the cursor on the line you wish to replace (Line 11, in this case).
-
Press Ctrl+Shift+O (Edit->Entries->Overwrite Entry). Note: The keyboard combination in the Expression Editor is Ctrl+Shift+W (Since version: 3.0).
-
Type in the number of the replacement entry (15 in this case), or zoom to select from a list.
-
Press Enter (or click OK).
Line 11 will now contain the new program (NEW IMPROVED Order Entry, in this case). The program at Line 15 will remain unchanged.
Hint: This is a good method to use to keep a “quick backup” of your current work. Make a copy of whatever you are working on using Repeat, and mark the copies so you don’t get confused. You can keep several working copies this way, and compare them easily, and use Overwrite to go back to any version if needed. Of course, for ongoing version control you also have Rollback.

