How Do I Properly Validate the Data Entered by the End User? (Magic xpa 4.x)
Much of the data validation in Magic xpa can be done when you set up the field model. For instance, if a field is supposed to be a number between 1 and 100, or can only contain ‘A’, ‘B’, ‘C’ or ‘X’, that can be entered into the model properties and the validation will be done with no further work on your part.
However, if you have more complex validations to do, you need to do these in a Control Verification logic unit.

-
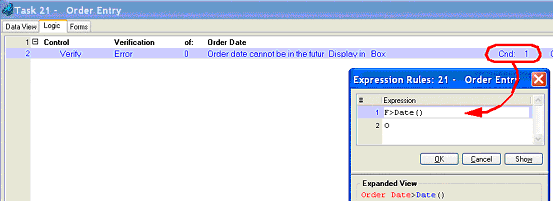
First, make sure the control you are validating has a control name. This one is called Order Date.
-
In the Logic Editor, create a Control Verification logic unit. Select your control as the control to validate. You can zoom to select the control from a list of all controls on your form.

-
Under the Control Verification logic unit, create a Verify operation. The steps to do this are:
-
Press F4 to open up a line.
-
Type E or select Verify from the pulldown list.
-
Type E or select Error from the next pulldown list. Tab.
-
In this field you can zoom to enter an error message to give the user, using variables, or ...
-
tab again to enter the error message with no variables.
-
After the Display in field, select Box (the default), unless you want the error message on the prompt line at the bottom of the screen.
-
In the Cnd column, zoom to enter an expression. You want the expression to evaluate to True when the data is in error.
Now, whenever the order date is in the future, the user will get an error message and cannot move past that field until either 1) the error is fixed (the condition becomes false) or 2) the user cancels all changes to the record (Ctrl+F2, or Edit->Cancel).
Hint: It is possible to create an error message that is impossible to fix, usually due to improper coding. For instance, if you leave the Cnd column hard coded as Yes, you cannot stop the error message. If that happens, it is impossible to exit the task. Another example, if you incorrectly enter a Verify Error operation, you sometimes really cannot exit the task. If that happens while you are testing, select Debug->Stop or press the red box on the toolbar.
The Online and Rich Client Samples projects (program TS17 and RTS17)

