How Do I Implement Logic with Push Buttons? (Magic xpa 3.x)
There are several steps to implementing logic with push buttons:
-
Create you user events
-
Put your push buttons on the form
-
Create a logic unit to perform the desired logic when the event is raised.
Let’s see how to do each of these steps.

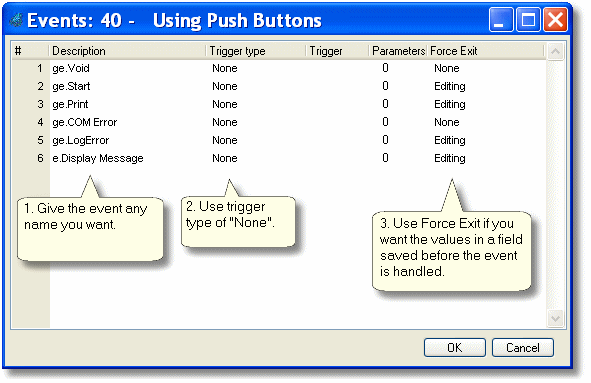
First, you need to create you user events. You do this in User Events (Ctrl+U). Press F4 to open up a line, and fill in the fields as follows:
-
In the Description column, give the event any name you like.
-
Select None for the Trigger type. You don’t need a trigger since this event will be raised by the push button directly.
-
For Force Exit, you will usually want Editing or None. Force exit = Editing causes the value in the edit field to be saved into the variable before the push button is pressed, which is generally what you want.
Enter as many events as you need for your push buttons.
Note: You can also just reuse global events. In the example above, the global events are marked with the prefix “ge.”. We have some standard global events that we use in many programs, such as ge.Print and ge.Start. If you use global events, you can even attach them to models, so you can automatically create buttons that raise the desired event.

-
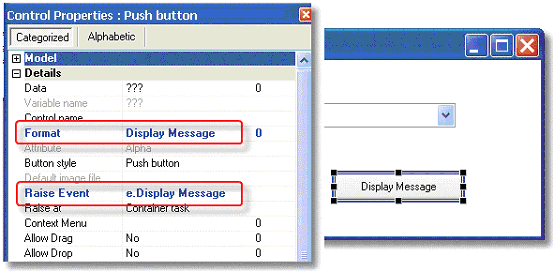
Drag the Push Button control  from the Toolbox and drop it on your form.
-
Resize it as needed.
-
In the push button Control properties, type in the Format. This will be the text that displays on the push button.
-
In the push button Control properties, zoom from the Event Type property, select Internal and from the Event property select your event.
Now, when the user presses the push button the event will be raised. In our example, when the user presses the Display Message button, the event e.Display Message will be raised. Now we need to create a logic unit to handle the event.

-
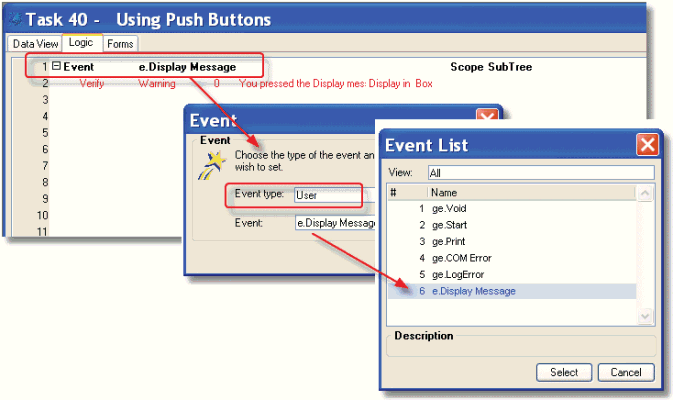
Go to the Logic tab.
-
Press Ctrl+H to open up a header line.
-
From the combo box, select Event (or type E). An event box will appear.
-
Select Event type: User, then tab.
-
An event list will appear. Choose your desired event.
-
Use the lines under the Event logic unit to add operations that will be performed when the event is raised.
Now you have an operational push button.
Note: In our example, we used a non-tabbable push button. You can also attach push buttons to variables so you can tab to them, by specifying the variable in the Data control property. When you do that, the Format property needs to be specified slightly differently, because the Format actually becomes a Picture for the data field. See How Do I Allow Keyboard Navigation to a Push Button?.
The Online and Rich Client Samples projects (program HG23 and RHG23)

