How Do I Define a Program Data View? (Magic xpa 2.x)
Whatever data is used by a Magic xpa task is declared in the Data View section. If you are using a particular data source, you do not need to bring in every column in that data source, only the columns you are using. You can also declare local variables and parameters as needed.
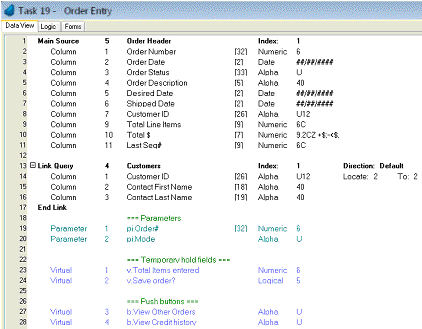
There are five basic types of data in the Data View section. The first three types of data are data sources:
-
The Main Source/Direct SQL. This is not required, but if it is entered, the task will by default read the entire data source. That is, if it is an online task, the user can view all the items in the table, and if it is a batch task, then the batch task will cycle through every record in the table. However, you can use the Range columns to limit how many records are read, or to read only one record.
-
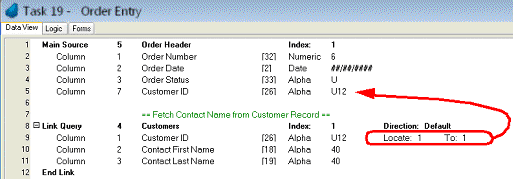
Linked sources: These are sources that are linked one-to-one with other sources. In this example, we are bringing in the Customer record that matches this order, to display the first and last name of the customer contact. Note that the entire table does not need to be brought into the Data View; only a few columns might be selected.
-
Declare: This lets you open a data source in this task, even if you choose not to use it. This would be done to optimize speed, preventing necessary table open/close operations.
The last two types allow you to declare variables that are not attached to any data source:
The Main Source has to be at the top of the list, but otherwise you can create them in any order. However, there might be some restrictions to keep in mind (linked data sources should be below the data sources they are linked to, for example), and it’s best practice to organize the data neatly. You can add comments and blank spaces too, which helps a lot with readability.
Below is an overview on how to create these. There is a lot more to learn in this area though, and we suggest you read the help files for more details.
-
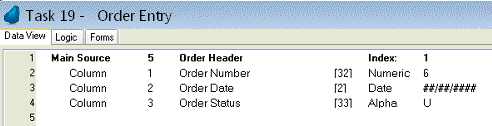
The Main Source header line always exists. You don’t need to create it. Just tab past “Main Source” and enter the data source# you want to access, or zoom (F5, double-click) to select it from a list. Then tab again.
-
Now you will be on the data source name field. Notice that you can change this. Changing the name of the data source here does not affect its entry in the Data repository, nor does it affect how the engine deals with the data in this task. However, it might make it easier to understand your program, especially if the same table is used several times in the task hierarchy. Tab again.
-
Now you will be on the Index field. Type in the index number, or zoom to select it from a list. Selecting the correct index is very important, as it effects the order of the records on a list, as well as the filtering speed if the range is restricted.
-
Lastly, choose Properties from the right-click mouse menu. Here you can choose the details about how the table is opened.
Once you have the main table set up, you can press F4 on the lines below, and choose the columns you want from that source. These columns are where you will add Range criteria to your Main Source to restrict the data view. For instance, you may only want to show one order, or only the orders for one customer.
Hint: Any data view entries of type Column you create in the Data Source will always refer to the Main Source, unless they are located within a Link/End Link. This is true even if you have several linked files and lots of virtuals in between. For readability though, it is best to keep the Main Source header together with its columns.
Entering a linked source is much like entering a Main Source.
-
First, press Ctrl+H to create the header line where you want your linked source.
-
In the combo box at the far left, select the type of link you want to do. Each link type works differently, but the Link Query is probably the most common. Tab to the next field. An End Link will automatically appear below your Link header.
-
Select the data source you want to link to, either by typing in its number, or zooming to select it from a list. Tab to the next field.
-
In the Index field, select the index you want to use to search for the linked record. Any columns that participate in the link will automatically appear below the link line, so you can use them to locate the linked record.
-
Select Properties from the right-click menu to control the details about how the data source is handled.
Now, when you press F4 between the Link and End Link lines, you will be able to choose the columns that you want to participate in the link. The Locate From/To properties are used to control which record is actually linked. In this example, we are selecting the record where the Customer ID on the Customer record matches the Customer ID on the Order Header.
You can create variables that are not part of any data source. These variables can be of two types: virtual or parameter. The only difference is that parameters are used to receive data sent from another task, and the number and data types are checked against the sent parameters of the calling task.
-
Go to the line where you want to create the virtual or parameter, and press F4 (Edit->Create Line).
-
Select Virtual or Parameter from the drop-down list. Tab to the next field.
-
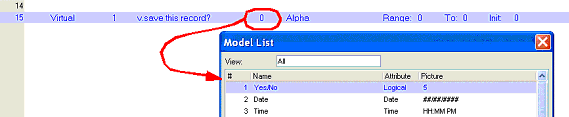
You are now in the name field. You can type in any name you like. You may want to use some naming conventions, as we did here (using ‘v.’ as a prefix for a virtual). After you enter a name, tab to the next field.
-
Now you are in the Model field. You can zoom from here and select a field model from the list. Using a model will save you a lot of time, help prevent errors, and standardize your tasks. If you use a model, you just select the model here and you are done. Otherwise, Tab to the next field.
-
Now you are in the data attribute field. If you didn’t use a model, select the data attribute (Alpha, Logical, Date, Time, etc.) by typing in the first character, or select it from the pull-down list. Tab again.
-
Type in the picture for this field, or press zoom to get a dialog to help you enter it. In the picture dialog, you can also press F1 to get context-sensitive help, which will tell you all about entering data pictures.
-
Press Alt+Enter or click on the properties pane to enter the data properties for this field. The data properties specify not only the size and valid values of the field, but can also specify how it looks on the screen (the control it uses). If you used a model, these values may already be set up for you, but you can override the inherited values if you need to.
Hint: One of the most common errors for new Magic xpa developers is creating fields with no picture. Once you select the data attribute, go immediately to the properties and enter the picture so the field has a length. If you run a program with a zero-length field, it will not run properly.
How Do I Define Reusable Data Objects?
The Online and Rich Client Samples projects (program TS01 and RTS01)
