How Do I Configure an Apache Web Server so Magic xpa Will Receive Requests? (Magic xpa 2.x)
Here are the steps you need to do to set up an Apache server with Magic xpa.
-
The Apache Web server must be installed, before Magic xpa is installed.
-
The Internet Requesters for Magic xpa need to be installed.
-
Configure the Apache directories
-
After the installation, check the installation and make sure the server is running.
Let’s look at each of these steps one by one.
Download and install the Apache server. You can download the version you need for you computer from http://www.apache.org. On the left, under “Apache Projects”, choose “HTTP Server”. The site has some installation tips, including how to deal with Windows security issues.
It comes packaged with its own installer; just follow the prompts. For a development machine, just choose “localhost” (“this PC”) for your Network domain and Server name.
After Apache installs, you will see the little “feather” Apache icon in your system tray. You can click on this to manage and monitor the Apache service. To test the Apache installation, open your browser and go to the address http:\\localhost.

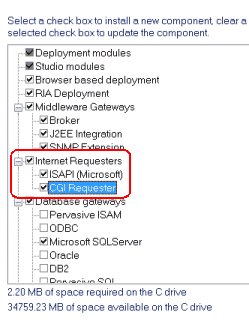
Now, install Magic xpa, or modify the Magic xpa installation, so that the CGI requesters are installed.
If you have already installed Magic xpa, you can add the requesters by:
-
Go to Control Panel->Add or Remove Programs->Magic xpa x.x->Change/Remove.
-
Select the Modify installation option.
-
Add a check before the ISAPI requester, as shown above.
Do NOT uncheck any option: that will cause that option to be un-installed.
Next, you need to set up the Apache directories.
-
First, you need to create directories for the scripts.
-
Then, you need to point the Apache configuration file to point to those directories.
-
Last, the Magic.ini needs to point to these directories

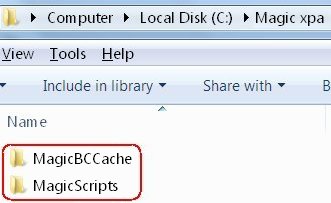
Next you need to create three directories, one for scripts, one for utilities, and one for cache. In our example, we have created these three in a directory called C:/Magic xpa x.x. We will be using these directories in our examples that follow.
The MagicScripts directory
Into this directory, copy the following Magic xpa files:
-
mgrqcgi.exe
-
MGREQ.INI
-
MGBC*.cab
-
MGBC*.js
-
*.jpg
-
*.css
The Apache configuration file is called httpd.conf and is found in the \conf subdirectory of wherever Apache is installed.
Here you need to create aliases for each of the three directories we created. You can copy the text below, changing the directory names to match your installation.
ScriptAlias /MagicScripts/ “C:/Magic xpa x.x/MagicScripts/”
<Directory “C:/Magic xpa x.x/MagicScripts”>
Options None
AllowOverride None
Order allow,deny
Allow from all
</Directory>
Alias /MagicBCCache/ “C:/uMagic xpa x.x/Browser_Client_Cache/”
<Directory “C:/Magic xpa x.x/Browser_Client_Cache”>
Options None
AllowOverride None
Order allow,deny
Allow from all
</Directory>
Change the following entries in the Magic.ini:
InternetDispatcherPath =/MagicScripts/mgrqcgi.exe
WebDocumentAlias =/MagicScripts
CTLCacheFilesPath = C:\Magic xpa x.x\Browser_Client_Cache
CTLCacheFilesAlias = /MagicBCCache
Depending on how you installed Magic xpa, the Broker will either run as a Service, or as an executable. If it runs as a Windows Service, then it can start automatically. If it is installed as an executable, you’ll need to start it manually. There is an option on the Start->Magic xpa x.x->Broker menu to start and stop the Broker.
You can ensure the Broker is running, and watch as it runs, by starting the Broker Monitor. You can read more about the Monitor in How Do I Monitor Broker Activity?.

To check if Apache is running, you can use the Apache monitor, or just hover over the icon in the Windows Task bar.

