How Do I Change the Menu of a Running Program? (Magic xpa 2.x)
You can design your menu structure within Magic xpa, in the Menu repository. However, you can also modify the menu entries at runtime, to make the menus change according to what program is running, or to change according to what is going on.
You can also choose which overhead menu entries are functional. These functions do not change the items on the menu, but they do cause the menu items to be disabled or to disappear.
-
MnuCheck() to check and uncheck a menu item. This causes a checkmark to appear, or not.
-
MnuEnable() to enable and disable a menu item. This causes the menu item to be greyed out.
-
MnuShow() to make a menu item appear or disappear.
These affect items that are on the menus. They are explained more fully in the How Do I Hide/Reveal a Menu Entry? topic.
The menu functions allow you to add and remove menu items. These functions don’t just change the menu entries; they can be used to build menus on the fly, adding complete menu branches within an existing menu structure. This is a very powerful feature, and gives you a lot of flexibility. There are three menu functions that are used:
-
MnuAdd() to add a menu item.
-
MnuRemove() to delete a menu item.
-
MnuReset() to reset the menu to the default settings.
Note: If you are changing menus only for security reasons, it is easier to use the Authorize option for that menu item. If the user is not authorized to use the menu item, it will automatically disappear without additional programming.
MnuAdd() allows you to add menu entries on the fly, anywhere within the menu system. The syntax is:
MnuAdd(MenuNumber, MenuPath)
where:
MenuNumber is the menu you want to add. This is the position of the menu in the Menu repository. You should use the MENU literal. In our example we will use '2'MENU.
MenuPath is a path of Entry Names of the menu item you want to insert this one after.
Let’s take a look at an example. Our overhead menu looks like this:
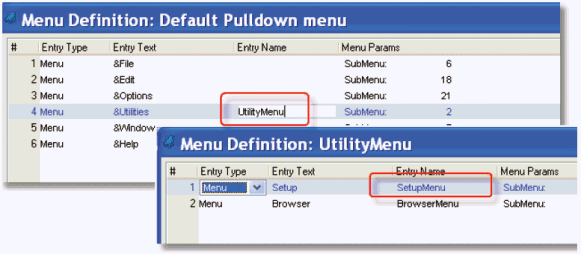
Our Menu repository looks like this. Menu 2 is the one we are going to add to the pulldown menu:
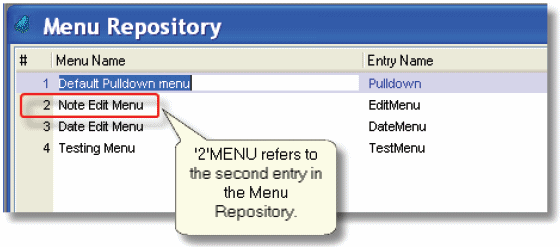
Now let’s see what three different versions of MnuAdd() will give us:
|
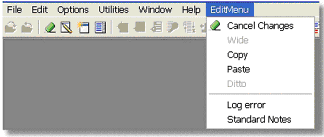
MnuAdd('2'MENU,'')
This adds the #2 menu, the EditMenu, in the last position of the default pulldown menu.
|
|
|
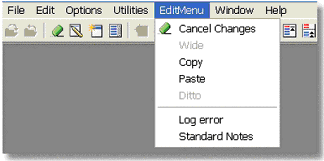
MnuAdd('2'MENU,'UtilityMenu')
This locates the menu after the Utility menu at the default pulldown level.
|
|
|
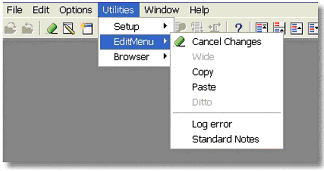
MnuAdd('2'MENU,'UtilityMenu\SetupMenu')
This locates the menu on the Utility menu, after the Setup menu.
|
|
MnuRemove(MenuNumber, MenuPath)
where:
MenuNumber is the menu you want to add. This is the position of the menu in the menu repository. You should use the MENU literal. In our example we used '2'MENU.
MenuPath is a path of Entry Names of the menu item you want to insert this one after.
MnuRemove() works like MnuAdd(), but in reverse. It removes the menu that was added. MnuAdd('2'MENU,'UtilityMenu\SetupMenu') or MnuAdd('2'MENU) would both remove the menu we added in our example.
MnuReset() resets the menus back to where they were before the MnuAdd() functions. For our example, we could use MnuReset() instead of MnuRemove(). But, MnuAdd() doesn’t remove just one specific menu that was added; it removes all of them.
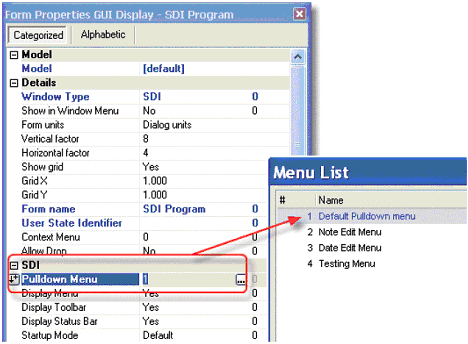
An SDI program has its own pulldown menu. You specify the Pulldown menu property on the SDI form. You can use an expression, but the expression is only evaluated once, when the program starts, so changing the expression won’t have any effect on the menu. Instead, use the Mnu functions on the SDI menus if you need them to change after the program starts.
The Online and Rich Client Samples projects (programs MN02, MN03, MN04, MN05 and RMN02, RMN03, RMN04, RMN05)

