Customizing Overlay Windows
Tip: This topic contains code snippets, which can be used as they are.
Magic program’s UI was already customizable. But until now, Magic provided a default container. You can completely control the UI of an overlay container. As you know, an overlay window consists of two parts:
-
The container (which contains title bar, background, borders, etc.)
-
The client area (which displays the magic program’s form)
In order to customize an overlay window, you need to do the following:
1. Provide an Overlay Container
Write a Component say, MyOverlayContainer, which will be used as the container for a Magic program’s overlay window. This MyOverlayContainer needs to be a subclass of BaseMagicOverlayContainer of @magic-xpa/angular module.
Input Parameters
MyOverlayContainer will be provided with Magic program’s overlay component and some other parameters as input. It is the responsibility of MyOverlayContainer to show the component inside a container and to pass on the parameters received by it to the inner component.
There are at least two ways of doing this:
1. Using ComponentFactoryResolver of @angular/core
You can accomplish it in three steps:
a. Define a DIV in HTML as a placeholder for your Magic program.
|
<div>
<div #overlaybody>
</div>
</div>
|
b. Refer it in TS file using @ViewChild.
|
@ViewChild('overlaybody', {read: ViewContainerRef}) overlaybodyViewContainerRef;
|
c. Create a Magic program’s component inside this placeholder using ComponentFactoryResolver.
|
const factory = this.componentFactoryResolver.resolveComponentFactory(this.ModalComp);
this.componentRef = this.overlaybodyViewContainerRef.createComponent(factory);
Object.assign(this.componentRef.instance, this.ModalCompParameters);
|
This approach is useful when the container needs to use some properties (like
ShowTitleBar, ShouldCloseOnBackgroundClick, etc.) from Magic component (using
MagicModalInterface).
For example, let magicModalInterface: MagicModalInterface = this.componentRef.instance
as MagicModalInterface;
This is because you get the component reference which you can use in the code.
|
import {
Component,
ComponentFactoryResolver,
EventEmitter,
Input,
OnInit,
Output,
ViewChild,
ViewContainerRef
} from "@angular/core";
import { MagicModalInterface } from '@magic-xpa/angular';
import { BaseMagicOverlayContainer } from "@magic-xpa/angular";
@Component({
selector: 'app-my-overlay-container',
template: `
<div class="my-overlay-foreground">
<div #overlayheader class="my-overlay-header">
My Dialog
<button (click)="OnClose()" style="float:right">X</button>
</div>
<div>
<div #overlaybody>
</div>
</div>
</div>
`,
styleUrls: ['./my-overlay-container.css']
})
export class MyOverlayContainer extends BaseMagicOverlayContainer implements OnInit {
/**
* content will be displayed in this placeholder
*/
@ViewChild('overlaybody', {read: ViewContainerRef}) overlaybodyViewContainerRef;
/**
*
*/
@Input() ModalComp = null;
/**
*
*/
@Input() ModalCompParameters: any = {};
/**
*
*/
@Output() onClose = new EventEmitter<void>();
/**
*
*/
private componentRef = null;
/**
*
* @param componentFactoryResolver
*/
constructor(
private componentFactoryResolver: ComponentFactoryResolver) {
super();
}
/**
*
*/
ngOnInit() {
const factory = this.componentFactoryResolver.resolveComponentFactory(this.ModalComp);
this.componentRef = this.overlaybodyViewContainerRef.createComponent(factory);
Object.assign(this.componentRef.instance, this.ModalCompParameters);
}
/**
*
*/
OnClose() {
//Note: Custom Overlay - You must emit this event before
//actually closing the window because, Magic xpa needs
//to execute RS, TS, etc.
this.onClose.emit();
}
}
|
2. Using ndc-dynamic
This is a third-party component to which you can provide the component and parameters. Then it takes care of initializing the component and passing the parameters to the newly created component. This approach is useful when the container is generic for all overlay windows. This is because we do not have reference of the magic program’s component.
|
import {
Component,
EventEmitter,
Input,
Output,
} from "@angular/core";
import { BaseMagicOverlayContainer } from "@magic-xpa/angular";
@Component({
selector: 'app-my-overlay-NDC-dynamic',
template: `
<div>
<div class="my-overlay-background">
</div>
<div class="my-overlay-foreground">
<div class="my-overlay-header">
My Dialog using ndc-dynamic
<button (click)="OnClose()" style="float:right">X</button>
</div>
<div>
<ndc-dynamic
*ngIf="ModalComp"
[ndcDynamicComponent]="ModalComp"
[ndcDynamicInputs]="ModalCompParameters">
</ndc-dynamic>
</div>
</div>
</div>
`,
styleUrls: ['./my-overlay-container.css']
})
export class MyOverlayContainerWithNDCDynamic extends BaseMagicOverlayContainer {
/**
*
*/
@Input() ModalComp = null;
/**
*
*/
@Input() ModalCompParameters: any = {};
/**
*
*/
@Output() onClose = new EventEmitter<void>();
/**
*
*/
OnClose() {
//Note: Custom Overlay - You must emit this event before
//actually closing the window because, Magic xpa needs to
//execute RS, TS, etc.
this.onClose.emit();
}
}
|
Output Parameter
MyOverlayContainer must emit the onClose event emitter when it needs to close the window. Note that it should emit the onClose when it needs to close the window and not when it is already closed (e.g. ngOnDestory). The reason is that Magic xpa needs to perform some tasks like Record Suffix, Task Suffix, etc., before actually closing the window. It might also happen that the closing is not allowed due to some errors or so.
2. Supply a Provider to be Used in Place of Default OverlayContainerMagicProvider
Magic queries for the Overlay container using OverlayContainerMagicProvider.getComponent(). So, supply a new Provider say MyOverlayContainerProvider, with getComponent(), which will return MyOverlayContainer (as mentioned in #1).
|
import { Injectable } from "@angular/core";
import { MyOverlayContainer, MyOverlayContainerWithNDCDynamic } from "./MyOverlayContainer";
// change this to correct path depending on where you place
// MyOverlayContainer.ts
@Injectable()
export class MyOverlayContainerProvider {
getComponent() {
// return MyOverlayContainerWithNDCDynamic;
return MyOverlayContainer;
}
}
|
3. Do the Following Changes in app.module.ts:
a. Mention Overlay container in declarations section.
declarations: [
AppComponent,
MyOverlayContainer
//MyOverlayContainerWithNDCDynamic
],
b. Mention Overlay container in the imports section as:
//For ComponentFactoryResolver add the following:
// import { MyOverlayContainer }
entryComponents: [
MyOverlayContainer,
],
// For Dynamic approach add the following:
// import { DynamicModule } from 'ng-dynamic-component'
Add this line in imports section:
DynamicModule.withComponents([MyOverlayContainerWithNDCDynamic])
c. Instruct to use MyOverlayContainerProvider instead of OverlayContainerMagicProvider in providers section as below:
providers: [
{
provide: OverlayContainerMagicProvider,
useClass: MyOverlayContainerProvider
}
]
Default versus Customized Overlay Windows
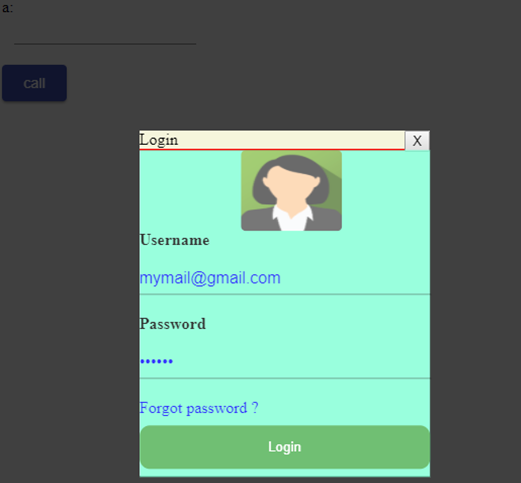
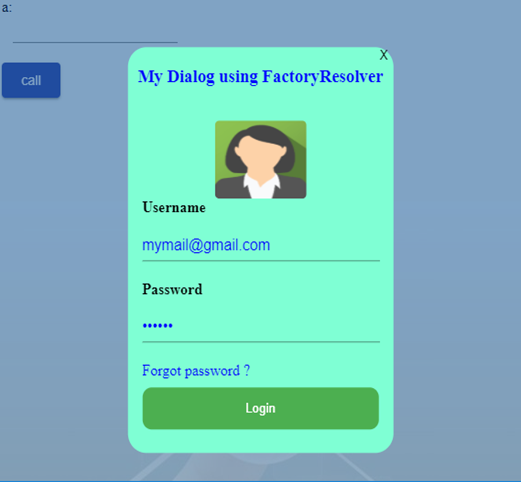
This is how a customized overlay window looks as compared to a default overlay window:
Default Overlay Window
|
Customized Overlay Window
|
|

|

|
Since version: 4.5

