Creating the Application Deployment Files (Magic xpa 2.x)
When executing a Rich Internet application you want to run the application over the Web without requiring an installation of the Magic xpa client on each client machine. For the Windows desktop, the deployment is done using Microsoft’s ClickOnce technology. ClickOnce is a deployment technology developed by Microsoft that enables us to execute .NET applications directly from the Web but is not bound by the constraints of the Internet browser. ClickOnce enables the user to install and run a .NET application by simply clicking a link on a Web page. The technology enables a client application to be run not only from the Internet, but also from a desktop environment, giving us the best of all worlds.
One of the benefits of using the ClickOnce technology is that it provides a way to deploy and upgrade applications without requiring administrative rights (except for prerequisites, such as .NET Framework or MsHtmlSetup).
When working with Rich Client applications, there are elements of your application that you need to expose to the outside world, but there are other elements that you don’t want to make available. Therefore, to provide for a secure environment for your Magic xpa Rich Client application, the elements of the application are separated into two:
-
Internal resource files – These are the files that only need to be accessed by the runtime engine, such as the ECF, Color, Font, Users, and local INI. The internal files should be adjacent to the ECF, such as in the Projects folder, and not accessible by the Web server.
-
External resource files – These are the files that need to be accessed directly by the client, such as the HTML file and manifest file, HTMLs, and PDFs. The external files are supposed to be available to the Web server and exposed using a Web server alias, the Published Applications alias that you provided in the Rich Client Deployment Builder.
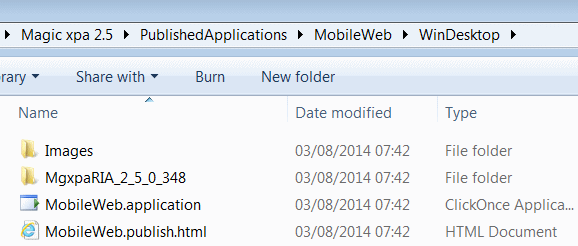
Magic xpa's Rich Client Deployment Builder enables you to configure and generate a number of files that are required in order to deploy a Rich Client application using ClickOnce:
-
Images folder – This folder contains images that are used in the HTML file.
-
MagicxpaRIA_X_X_X_XXX folder – This folder contains RIA Client modules.
-
.NET Deployment Manifest file – The ClickOnce deployment is invoked through this file.
-
HTML file – The HTML page enables the users to install the RIA client via a hyperlink. You can edit this file or use the code within a different HTML page of your own. This web page is required only once in order to install the RIA client. Once the RIA client is installed, the users can start it by using a desktop icon.

These files and folders are saved in the PublishedApplications folder in a subfolder with the project’s name, so each project has its own settings files.
When running the Rich Client Deployment Builder, make sure to define the certificate and password for the .NET manifest file. It is highly recommended not to use the test certificate provided with the Magic xpa installation, since the publisher is not verified in that way. Instead, you should use your own certificate so that the publisher will be verified.
|
Note:
|
You should always re-create the manifest file when upgrading the Magic xpa engine.
|
You can also install the application manually without ClickOnce.

