Creating an SSL Certificate to Work with the LDAP Functions that Require Passwords (Magic xpa 4.x)
The functions that require a password to add, modify or delete users from an LDAP server will not work with a regular LDAP connection. They require an SSL session with the server which requires an SSL certificate.
When using an LDAP function that requires the SSL session:
-
Enable LDAP over SSL (LDAPS) on your Active Directory server.
-
Add the ssl:// prefix in the LDAPConnect function (port 636 will be used).
-
Create certificate files in one of two ways:
A. Using Netscape DLLs
-
-
Export the CA certificate in base-64 encoded format to a file, for example, certnew.cer.
-
Use the zip files from the following links:
https://ftp.mozilla.org/pub/security/nss/releases/NSS_3_3_2_RTM/WINNT4.0_OPT.OBJ/nss-3.3.2.zip
https://ftp.mozilla.org/pub/nspr/releases/v4.2/WINNT4.0_OPT.OBJ/nspr-4.2.zip
-
-
Unpack both packages and copy nspr-4.2/lib/*.dll and nss-3.3.2/lib/*.dll to nss-3.3.2/bin.
This is because the NSS depends on the NSPR DLLs to run.
-
Copy the certnew.cer certificate in the bin directory of the extracted NSS package.
-
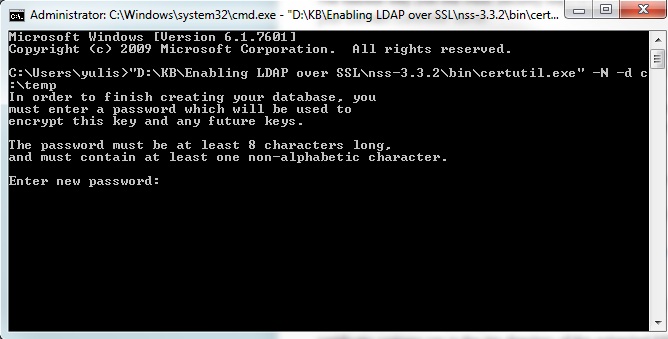
Run the command below to initialize the database.
This command will generate cert7.db and key3.db files.

-
Run the command below to add the certnew.cer certificate into the cert7.db:
D:\KB\Enabling LDAP over SSL\nss-3.3.2\bin\certutil.exe -A -n "CACertDWOrg" -t "C,," -a -i .\certnew.cer -d C:\
-
You should get the files below in the root of C:\.

-
After creating the certificate, copy the cert7.db, key3.db and secmod.db files from the root folder to the Magic xpa root directory.
Refer also to: http://newzbie.blogspot.co.il/2013/06/create-cert7db-and-key3db-for-enabling.html
B. Using the Netscape browser
-
Download and install Netscape's 4.xx Web browser.
-
Run the Netscape browser.
-
Open the following URL: https://YourLDAPServer:sslport where:
-
YourLDAPServer – Your LDAP server address, provided as an IP address or a host name.
-
sslport – The port number used by your LDAP server to accept SSL connections.
-
The Netscape Certificate Assistant window opens. Follow the instructions provided there, and accept the server certificate for this and future sessions.
-
Copy the cert7.db, key3.db and secmod.db files from the Netscape user profile directory to the Magic xpa root directory.
Refer also to:
http://www.ldapadministrator.com/forum/viewtopic.php?f=2&t=15&start=0
http://www.wikihow.com/Establish-an-SSL-Connection-Using-LDAP-Browser-2.6

