Component SDK (Magic xpi 4.1)
When working with Magic xpi, there may be occasions in which you need to add your own specific code in order to perform a needed functionality that is not provided by the Magic xpi Suite.
The Magic xpi Studio’s SDK provides this capability.
User-defined components may be created using uniPaaS and Java. This document shows how to create user-defined components using uniPaaS and Java.
Magic xpi provides a component SDK utility that lets users define and modify user-defined components.
As with any Magic xpi-provided component, the user-defined component exposes a number of user-defined methods, each with their own parameters, which may be used in a step or trigger in a flow.
These methods will be exposed in Method and XML interfaces.
We need to invoke the Component SDK Maintenance screen from the Tools menu. This screen displays a list of previously created user-defined components. Clicking the New button will start us on our way.
General Details
In this initial stage, we define the properties for the component configuration:
|
|
|
|
Name
|
We can change the component name.
|
|
Description
|
This will appear in the Component Repository.
|
|
Icon file name
|
The icon that will appear in the component images.
|
|
Class type
|
Defines whether the components will be based on uniPaaS or Java.
|
|
Execution mode
|
Select whether the component will be used as a Step or as Trigger (available only for uniPaaS). For additional information about the Trigger mode, see the Component Model SDK topic in the Magic xpi Help.
|
|
Resource type
|
The name of the Resource Type that will be attached to the component, or a link to create a new Resource Type.
|
Advanced Details
In this stage, you define the following:
|
|
|
|
ECF Name
|
The program that will be invoked during deployment in order to run the component. This is a read-only property.
|
To define component methods, click the Methods button.
Component Methods
Method Definition
In this stage, you can define the methods that the component will provide in its Direct Access interface.
|
|
|
|
Name
|
The method name in the implemented class.
|
|
Display Name
|
The method name that will be displayed in the Direct Access interface.
|
|
Description
|
This will appear in the component Direct Access configuration screen.
|
You can add and define new methods, delete selected methods or delete all defined methods using the provided buttons.
|
Note:
|
-
As of Version 3.1, to generate the methods, you must click the Generate button. When you click OK, Magic xpi only saves the new definitions.
-
The Checker cannot check changes to user-defined components.
-
Java components with an XML interface do not return Output.
|
|
Method Arguments Definition
In this stage, you can define the arguments provided for each method. The defined arguments will be provided for the selected method in the Methods table above.
|
|
|
|
Name
|
The argument name in the method of the implemented class.
|
|
Type
|
This determines the argument type. You can select between Alpha, Numeric, Logical, Date, Time, BLOB.
|
|
Picture
|
This will determine the argument picture.
|
|
Direction
|
Select between In, Out and In/Out.
In means the argument contains a value that the method can use but not change.
Out means the argument will contain a return value from the method.
In/Out means the argument contains a value that can be changed and returned back from the method.
|
|
Display Name
|
The argument name that will be displayed in the Direct Access interface.
|
|
Tooltip
|
Text of tooltip that will be displayed when the argument is selected.
|
|
Value Type
|
Select from:
Expression means the argument can accept expression values. The display will have a text box and Expression Editor push button.
Variable means the argument can accept a variable name as a value. The display will have a text box and push button to open the variable list.
Combo means the argument can accept a value selected from a combo box. Select the ‘…’ push button to define the combo box values.
Fixed Value means the argument accepts a predefined fixed value. This property is usually combined with setting the argument as invisible, allowing passing additional arguments to the method.
|
|
Visibility
|
Defines whether the argument is visible.
|
|
Mandatory
|
Defined whether the argument is mandatory. You cannot define a field as mandatory if it is invisible and does not have a default value.
|
|
Default Value
|
Specify a value or an expression that will be used as default value and displayed in the Method interface.
|
Linked Combo Boxes
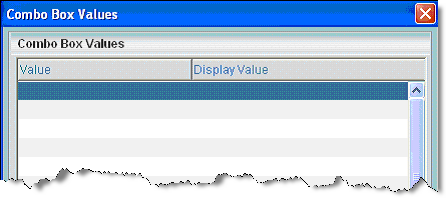
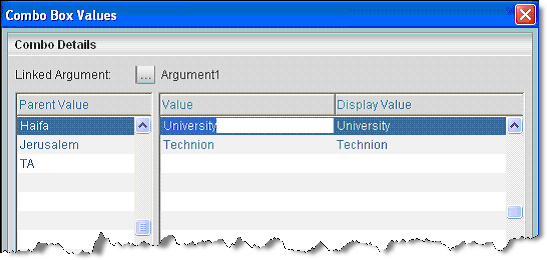
You can create a parent-child relationship between two arguments implemented as combo boxes. A value selected in the parent combo box will result in a dedicated set of values in the child combo box.
The first argument defined as a combo box allows the definition of combo values:
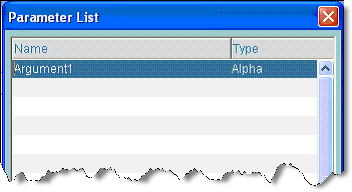
Any additional argument defined as a combo box will provide a selection of the parent linked argument:
When selecting the parent argument, the following dialog box will be displayed allowing the definition of linked combo box values for every parent combo value:
In this stage, you can load the methods that the component will provide in its Direct Access interface from existing uniPaaS programs. Click the Load button to open the Load Programs Definitions screen.
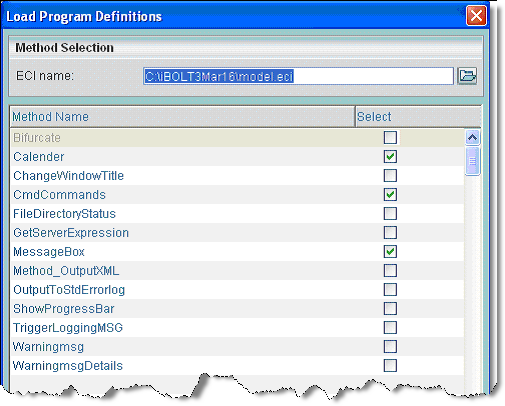
You must provide a uniPaaS ECI file name. Magic xpi will display the list of all methods defined in the file. You can select all or only part of the available methods. The selected methods will be available in the main Methods screen for additional editing.
In this stage, you can load the methods for the Java component type. It will provide Direct Access interface from existing Java classes. Click the Load button to open the Load Programs Definitions screen for Java:
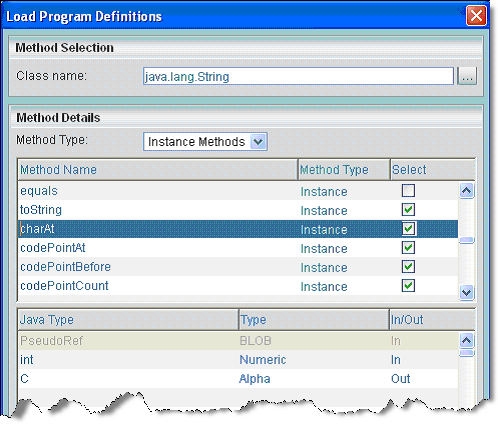
You must provide a Java class name. Magic xpi will display the list of all methods defined in the class. You can select all or only part of the available methods. The selected methods will be available in the main Methods screen with its respective arguments. You cannot modify method details on the method screen. You can only delete the methods. Adding new methods for a selected Java class can only be done by clicking the Load button.
Final stage
Click OK to finish and save the definitions of the Methods.
In this stage, you can define the errors that the component will provide during its operation. Click the Errors button to open the Error Details dialog box. This dialog box has the following properties:
|
|
|
|
Code
|
The error code. The error code must be unique in the component error list but can be identical to error codes in other components.
|
|
Description
|
This will appear in the Error repository and in the Monitor when the error is raised.
|
You can define new errors, or delete selected errors using the provided push buttons.
As previously explained, you can attach an existing resource to your new component. However, if your environment contains a resource type that does not exist in Magic xpi, you can define a new resource type that the new component will be attached to. Click the Resource Types button in the main component configuration screen to open the Resource Details dialog box:
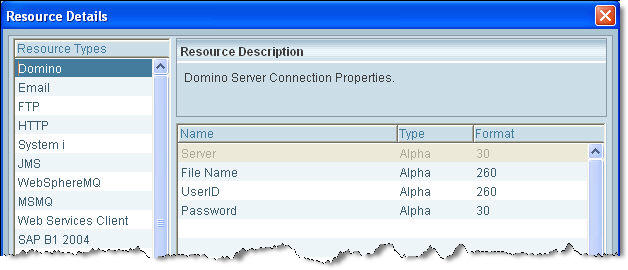
Click the New button to open the New Resource Type dialog box:

Resource Type Definition
In this stage, you can define the Resource that the component will use.
|
|
|
|
Name
|
The Resource Type name.
|
|
Description
|
Resource Type description.
|
Resource Type Arguments Definition
In this stage, you can define the arguments provided for the new resource type.
|
|
|
|
Name
|
The argument name in the implemented class.
|
|
Type
|
This determines the argument type. You can select between Alpha, Numeric, Logical, Date, and Time.
|
|
Length
|
This will determine the argument length.
|
|
Tooltip
|
Text of the tooltip that will be displayed when an argument is selected.
|
|
Value Type
|
Select from:
Expression means the argument can accept expression values. The display will have a text box and Expression Editor push button.
Combo means the argument can accept a value selected from combo box. Select the ‘…’ push button to define the combo box values.
|
|
Default Value
|
Specify a value or an expression that will be used as default value and displayed in the Method interface.
|
|
Encrypt
|
Specify whether the argument will be encrypted.
|
|
Logical Name
|
Specify whether the argument will support Environment Variables as an expression in the Value Type field.
|
The new component is created in a directory by the same name, under the installation \User Resources\Components\ directory.
uniPaaS Components
The created directory consists of the following:
|
|
|
|
Step.idd
|
The component XML configuration file, including errors, methods and resources.
|
|
Componentname.edp
|
Component source file. This is the file the user needs to edit.
|
|
Componentname.ecf
|
Component runtime file.
|
|
Componentname.eci
|
Component interface file with list of exposed programs.
|
|
XSD directory
|
This contains the XSD file that will be used when using the XML interface. The file name is step.xsd for step-type component or trigger.xsd for trigger component.
|
|
Source directory
|
The component uniPaaS source code directory.
|
The component generation process generates predefined uniPaaS programs for the new component.
Step component
The created programs consist of the following:
|
|
|
|
Main Program
|
Component Main Program. The Main Program has some Global variables. These are used by the component and should not be modified. All new user-defined Global variables should be created after these.
|
|
SetResource
|
Sets the new component model Resource Type (if defined). This program is called before the step starts and sends all Resource arguments to the main program. The user must write the code to check the resource.
|
|
MethodName
|
A program created for every method defined. In addition to the user-defined arguments, the variables ErrorCode and ErrorDescription are created. User must update these variables in order to raise an error during processing.
|
|
VersionOK
|
Global function allows user to define logic for checking the component version.
|
Trigger component
The Trigger is based on the polling mechanism. You must implement the Trigger logic and polling details in the Trigger Logic program.
|
|
|
|
Main Program
|
The Main Program has some Global variables. These are used by the component and should not be modified. All new user-defined Global variables should be created after these.
|
|
SetService
|
Sets the new component model Service Type (if defined). This program is called before the trigger starts and sends all Service arguments to the main program. The user must write the code to check the Service.
|
|
Start Trigger
|
Called when the Server starts and calls the Trigger Logic program.
|
|
Trigger Logic
|
User-defined Trigger code.
|
|
Enable
|
Called when flow is switched to enable mode. This method must continue the flow in Trigger Logic program.
|
|
Disable
|
Called when the flow is switched to disable mode.
|
|
VersionOK
|
A Global function that allows user to define logic for checking the component version.
|
Java Components
Step Component – The uniPaaS Code
A method program is generated for each selected method in the generated component.
The generated method program has following logic.
-
If the selected method type is a Constructor then the method program logic will have the Jcreate statement, which will provide the pseudo reference by calling the specified constructor of the java class, which is used to access the methods of the class.
-
If the selected method is of the type ‘Instance’ then the method program logic will have a Jcall statement, which is used to execute the java class method and return the required result.
-
If the selected method is of the type ‘Static’ then the method program logic will have a JcallStatic statement, which is used to execute the static java class method and return the required result.
The generated component logic is a shell that has no predefined logic. The only logic is the logic provided by the Magic xpi engine in order to enable the application to work as a flow component.
To edit the component, you should park on the entry for the component in the Component SDK Maintenance and click the Edit button. Magic xpi will load uniPaas to edit the application.
User-Defined Programs
Programs need to be added according to the required methods. The public name of the program will be the name of the method.
Deploying the Component
To deploy the component, you need to create the ECF file. The ECF file should be recreated if any changes were made to the component.
The ECF should be created under:
%User Resources%\Components\<Component name> – This entry is for reload capabilities.
Component Repository
If changes were made in the Administration program, such as removing an interface type, these changes are not automatically reflected in the Component Repository.
If the changes are not reflected in the repository, you may need to restart the Magic xpi Studio.

