Branching with Git
Let us see, the need for branching and how you can perform various operations with branches.
Need for Branching
Distributed version control systems like Git give individuals wide flexibility in how they use version control to share and manage code. Your team should find a balance between this flexibility and the need to collaborate and share code in a consistent manner.
Team members can publish, share, review, and iterate on code changes through Git branches shared with others. You need to adopt a branching strategy for your team so that you collaborate better by spending less time in managing version control and investing more time in developing code.
For example, consider a tree. A tree has some branches on its large trunk. Similarly, the master branch in Git is like the trunk of a tree and other branches are smaller parts of the project which need not interfere with the main branch (recall master). They have their own commits and are added to master once they are completed. In most cases, the code contained in the master branch is usually the one being deployed.
Branching Strategy
Keep your branch strategy simple by using feature branches. The core idea behind working on the feature branch is that all feature development should take place in a dedicated branch instead of the master branch. This encapsulation makes it easy for multiple developers to work on a particular feature without disturbing the main codebase. It also means the master branch will never contain broken code, which is a huge advantage for continuous integration environments.
-
Use feature branches for all new features, releases and bug fixes.
-
Merge feature branches into the master or release branch using pull requests.
-
Keep a high quality, up-to-date master or release branch.
Each of these branches have a specific purpose and are bound to strict rules as to which branches may be their originating branch and which branches must be their merge targets. Unlike the main or release branches, these branches always have a limited life-time since they are removed eventually.
Recommendations:
-
It is recommended that you create/define the branches directly on the remote directory. Doing this you will have a separate working folder for each branch and further makes it easy to maintain branches.
-
Create branch for each feature and bug fix and then merge that back in to the main branch. This would be a slight overhead but will keep the coding process clean.
Follow the guidelines from these URL:
· https://docs.microsoft.com/en-us/vsts/git/concepts/git-branching-guidance
· https://www.atlassian.com/git/tutorials/comparing-workflows/feature-branch-workflow
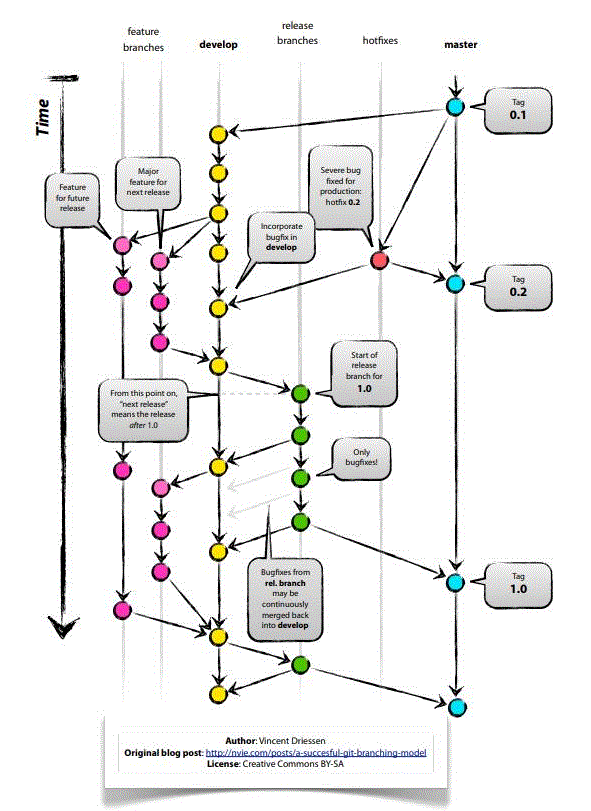
The illustration of branching is as shown:

Generating a Unique Version Control ID
Earlier, you had to determine VersionControlID and specify it in Magic.ini. You needed to remember VersionControlID and VCProjectID to be able to work on the correct project. In such case if multiple developers were working, then the uniqueness of ISNs was not guaranteed. In order to bring uniqueness in ISNs automatically, Magic xpa provides a mechanism that handles generation of unique ISNs.
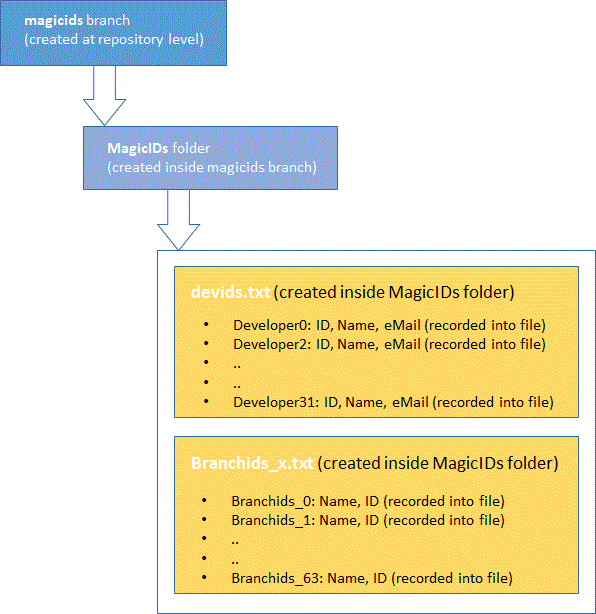
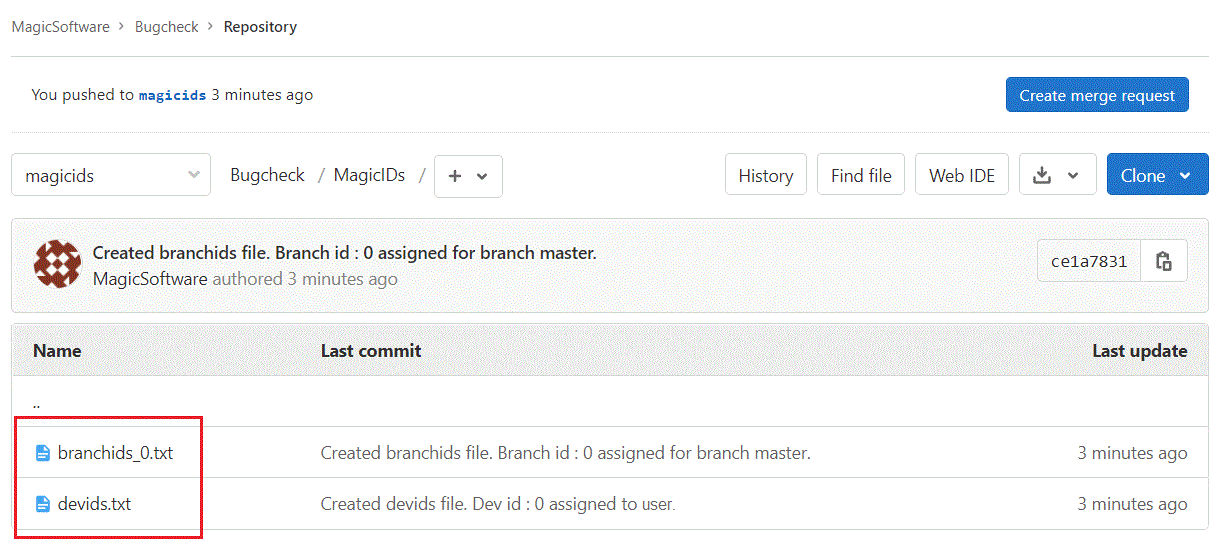
Magic xpa creates developer IDs to assign unique ISNs to each of the developers. It records these developer IDs in the file named devids.txt, which is created inside the folder named ‘MagicIDs’ in the uniqueness branch named magicids.
When you connect a project to Git for the first time, Magic xpa adds the following information into devids.txt file:
-
Developer's ID
-
Developer's Name
-
Developer's eMail
When you open a Git project via xpa Studio, Magic xpa reads the uniqueness file and sets the developer's ID and branch ID to create the ISN for that particular Developer for that specific project.
Please see refer the following illustration:

The files devids.txt and branchids_x.txt contain unique developer IDs and Branch IDs respectively.
The devids.txt file is created for each project.
Magic xpa creates a branchids_x.txt for each developer. Depending on the developer and their corresponding working branch, the project is opened in Git. Each time the branch is created and switched to a new branch, the Branch ID is updated in the file branchids_x.txt.

When a developer opens a project via Magic xpa studio, the Studio accesses the uniqueness file from the local branch as defined in Magic.ini, and sets the developer's ID, which is later used for assigning ISNs in this studio session.
When a user is changed or a branch is changed then Magic xpa automatically accesses the branchids_x.txt and devids.txt files.
Adding a New Branch from Magic xpa
You can add a branch using the menu option Version Control > Create Branch.
Magic xpa creates unique branch IDs for you. Meaning, Magic xpa creates a branch id file (branch uniqueness file) named branchids_x.txt (where x is the developer ID) at repository level inside the folder named MagicIDs. The file stores active branch names and numbers.
For each user, a specific branchids_x.txt file is created, which contains branch ID and branch name.
Whenever a branch is created, the branchids_x.txt file is updated. The file is created if it did not exist at the time of creating a branch and it will be pushed to the uniqueness branch in the GIT repository.
Note: Each user can create maximum 64 branch IDs.
Connecting Magic xpa with Git Repository

